Geodesic Dome

Wednesday, May 2, 2018

Project Review

The Geodesic Dome construction undertaken for our ESD project was fairly challenging but rather fun. We as a group worked well together despite ongoing difficulties throughout the domes construction. All in all we believe it was a reasonably successful outcome, as the dome structure held up well during the water test.

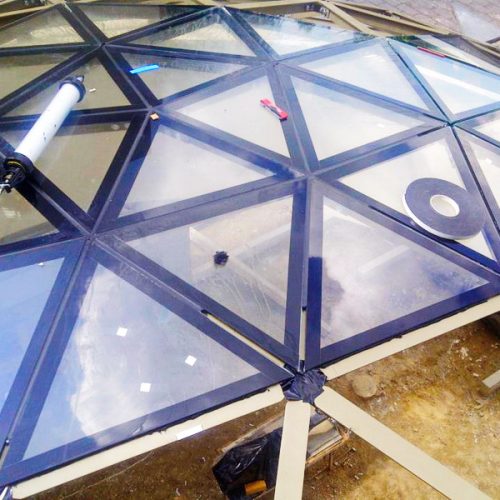
If partaking in this project as a group again, the main alteration we would make to our process would most definitely be the connections of the structural triangles. As can be seen in the image below it started to fall apart towards the end of our construction because the aluminium rings we used to connect the timber were significantly flimsy. There was multiple reasons why we had to chose aluminium as connections such as budget and equipment constrain. The aluminium sheeting was thin enough to be able to be cut with scissors.
Further more this alteration would have benefited the construction of the window. It was difficult to get the window frame to sit right due to the organic shape created by the instability of the connections used. Contrary to these predicaments, we were still able to get the window in place and waterproofed with no leaks throughout the water test.
A further error was made when cladding one of the panels because the size of one cardboard panel was incorrectly calculated. This results in a small gap between the panel and the timber frame, which can also be seen in the image below. Due to material constrain, we were unable make another waterproof cardboard panel. Terefore we used the off-cuts of the material to cover the gaps.
For ease of demolition we used timber screws. We will unscrew the structure and reuse the timbers and cardboard for future projects. 
Overall, the geodesic dome was structurally not sound but it was successful in keeping water out and was able to stand on its own which we were proud of.

Tuesday, May 1, 2018

Water Test


Cladding the Dome

Once the dome was erected the bottom of the dome was fixed with timber and aluminum strips.

In order to clad the dome we decided to use cardboard sheets as they were quiet cost effective and easy to cut. These cardboard sheets were then waterproofed with a spray on clear coat. Once dried they were then cut to shape and fixed to the dome skeleton with wood screws.
Once the cardboards were fixed to the frame, we then drew out the window on a clear sheet of perspex which was then cut and fixed to the frame with screws. In order to make the window sill we used wood to wedge the perspex between and left a small gap at the bottom of the sill in order to allow for water to be able to escape as can be seen in the image below.

Once all the cladding was fixed and the window was put in place we caulked all the gaps and holes with silicon to make sure everything was waterproofed. Below is the final result of the dome.

Sunday, April 29, 2018

Materials and Process to Create the Core Structure

The key materials chosen to create the main geodesic dome structure were timber cut at two sizes (730mm and 840mm), a large aluminium flat sheet and screws.
The timber was cut at longer and shorter lengths in order to create or triangular sections. We laid out the timber on the grass in order to plot out where the timber would connect and meet the other triangular sections to create the main structure.

We chose to use aluminium flat sheet to create our brackets as it was flexible and would suit the dome's natural bends once erected. We cut the aluminium flat sheet into strips based on the thickness of the timber. We then curved the strips into circles and marked out where the timber would intersect into the aluminium.
Following this, we fixed the timber to the circular strips using screws and then repeated the process on the remaining triangular sections.


Once the structure was connected together and laid flat on the ground, we erected it by lifting from the centre and then connected the base areas together using the longer pieces of timber and the aluminium strips.


Friday, April 20, 2018

Window Detail

Basic type for green houses

Window can be made from perspex and set on top of the dome frame. The image below portrays how the window was laid on top of one of the structural triangles.

In order to ensure the window frame maintains waterproof, silicon was used to line the edges of the frame. This prevents the water from getting inside and the water will then slide down to the bottom of the structure.

Image result for geodesic dome window

To further waterproof the window, flashing is put at the back edge of the window frame and fixed to the timber with screws.


http://geodomas.eu/nb/portfolio/roof-deck-low-structure/

Thursday, April 19, 2018

Possible connection details

Bolts

Put the PVC hubs together by threading a 1/4" bolt through the holes, leaving long enough bolts to attach covering

Hubs

Hubs connect all of the struts together to form the structure. 

Gumdrops

Connected by gumdrops for small scale experiment 

Welding

Connected in the center via welding

Overlapping pipes

Connected by steel pie with bolts, this is a quite good method to be considered.
Overlapping connection with each other. This way might not work due to the scale of the structure.


PVC Hub

Connected by cutting PVC hub as a connector and fixed with cable ties

Bracket

Connected by bracket with bolts through timbers


References:
http://www.ziptiedomes.com.au/
https://makezine.com/2015/04/10/build-functional-geodesic-dome-pvc/
http://www.instructables.com/id/How-to-build-a-PVC-geodesic-dome/

Wednesday, April 18, 2018

Dome building methods - Beveled frame


The beveled frame method is the most flexible and efficient dome building system. You start by putting bevel down one side of the timber. 

Alternatively, use a thicker piece of wood and cut down the center so you get two piece of timber and there will be no waste.
The face of the timber frame is flush with the face of the panel


Prepare 3 struts with beveled edges. You then screw the 3 struts together and trim off the ends flush.

This gives you a triangle frame with bevel on all the outside edge. When you join another one to it, it kicks up and form the curvature of the dome.


With this system there is no central hub. The glass would then sit on top of frame using double sided glazing tape, silicon seal behind the glass and between the glass.


Advantages:

  • Simple build method that is tolerant of DIY fabrication
  • Cheap to make because there are no hubs to buy
  • Very flexible, can be covered in pretty much any material
  • Can be used on all building types, maybe not for tents
Disadvantages:

  • Hard to cut the angles of the wood
Source: https://www.youtube.com/watch?v=JRbTyFK2m7s
http://geo-dome.co.uk/article.asp?uname=geo_polydome

Dome building methods - Tube and hub


The tube and hub is another simple construction technique, slightly more work than the flattened conduit method but is a more professional and flexible system. Instead of joining the struts directly together a larger diameter pipe is used as a hub holes are drilled through the hub and the struts are bolted to it. It comes in a huge range of different designs. No matter what system, they all share same advantage and disadvantage.


Advantage:

  • It can be disassembled easily because it is usually bolted.


Disadvantages:

  • A lot of hubs needed for the construction and several different types are needed. The cost of adding hub is high, so it is a fairly expensive way to build.
  • If the cover is a hard material, there will be a void above the strut and above the hub, which is not desirable


 http://geo-dome.co.uk/article.asp?uname=tubehub
https://www.ziptiedomes.com/2vmanual.htm


Dome building methods – Arrowhead


This method does not use hub, just make angle at the end of each strut and connect them together. Because it uses no hub, it is a cheaper method to build a dome. However, there are a lot of issues with this method.
There are a lot of compound angle. The angle need to be cut accurately. even just 1mm difference will add up to pushing frame apart and form gap.
There are too much screws close together to hold the strut. Also they are close to the end which is can break the strut.

Advantages:

  • Cheaper way to build because it doesn’t use hub

Disadvantages:

  • Very awkward to cover in any material except a fitted canvas
  • Not structurally sound, screws can tear out
  • Hard to disassemble, if you need to move it


Source:
https://www.youtube.com/watch?v=HBUVu9uXyPs

Dome building methods - flattened conduit

geodesic-dome-plans

The flattened conduit is another method looked into for possible construction. This Process involves flattening the end of some metal tubing bend it slightly then drill a hole. Do this to both ends get yourself a bag of bolts and you can easily build a dome framework.

Advantages: 


  • Easy to assembled/disassembled, no special tools required, just make sure you don't split the tube when you flatten it and that you flatten enough so you can put the bend in without interfering with other struts. 
Disadvantages: 

  • Quite crude. Also this type of dome framework is usually covered in canvas or similar material, which can be quite difficult to get tight and crease free over the structure. Also of the unevenness of the joints can make it difficult to cover cleanly.

geodesic-dome-plans-free
This is how to join the bars for your dome


Source: https://www.youtube.com/watch?v=RasWKQfpFzY
http://geo-dome.co.uk/article.asp?uname=flatcon
https://diyprojects.com/build-268-square-foot-geodesic-dome-for-300/

Sunday, April 15, 2018

The Strength Behind The Dome

As a structure the geodesic dome is strong and stable due to the frame being constructed through triangles.Triangles are the strongest structural shape as the have all fixed angles, and are very difficult to distort. This is achieved through the triangle's ability to spread loads. For example if a force is placed on one side of the triangle, its load will be spread and supported throughout the other two sides. In order to achieve this strength and a sturdy dome, the struts assembled in a triangle are called trusses which must be cut exactly to scale and the straight ends of these trusses must meet at a middle point called the node.

Benefits and Construction of the Geodesic Dome

The Geodesic dome's robust structure allows for any occupant under the dome to be secure from any sort of external elements such as wind and rain. The dome's unique structure allows for it to increase its strength as the structure increases in size as its main strength is dependant on its structural supports.

Geodesic domes allow for a relatively easy way to assemble which can be completed in a short amount of time. These domes being connected as one structure can also be easily moved from site to site.

Geodesic domes can be assembled using predominantly recycled materials such as timbers and steel, reducing the amount of negative impacts on the environment. The domes when used as a form of housing can be significantly energy efficient due to the insulating properties of its components.

The most basic geodesic dome design consists of an icosahedron with 20 faces that are equilateral triangles, the more triangles the larger the dome, resulting in a stronger structure. The rods or struts that build up the frame of the dome can be made with metals or timbers depending on the lengths. Steel is commonly used in making the areas that connect to the struts/ rods.

Once the frame of the dome has been assembled, the triangular spaces can be covered using materials such as timber, plastic, concrete or plasters.


stevenbrace.co.uk


What is Geodesic Dome Frequency?

Dome Frequency is denoted by the letter "v".
"2v" is short for "2 frequency". A 2v dome is a 2 frequency dome, and a 3v dome is a 3 frequency dome. 2 frequency has two different lengths and 3 frequency has three different lengths. 

The short explanation for dome frequency is, the higher the "v", or frequency, the more triangles there are in the geodesic dome. A higher frequency dome with more triangles will be stronger and more spherical than a lower frequency dome, and the higher frequency dome will be more complicated to build, as it will have more struts.

Reference: https://www.ziptiedomes.com/

Monday, April 9, 2018

What makes up the Dome

A geodesic Dome is an arrangement of triangles. They are efficient structures as the triangles are a very stable shape. This makes the geodesic dome buildings highly resistant to forces such as snow coverings, earthquakes, wind, and even tornadoes. The surface area of a geodesic dome is substantially less than the surface area of a box-shaped building enclosing the same floor space. There is less surface exposed to outdoor temperature fluctuations, making the building cheaper to heat and cool than a rectilinear structure. 
An advantage of the geodesic dome is that it can be constructed quickly without heavy equipment using prefabricated components. The dome supports itself without needing internal columns or interior load-bearing walls. FIG. 1 shows how the triangles are placed.

FIG.1

Saturday, March 3, 2018

The Birth Of The Dome

In the early 20th century R.Buckminster Fuller was looking for ways to improve human shelter. He wanted to make a shelter that was comfortable, efficient, economically available and something that would be technologicaly modern.

Buckminster Fuller acquired some experience in the building industry and discovered that the traditional practices and perceptions severely limit changes and improvements in construction practices. Fuller carefully examined and improved interior structure equipment, including the toilet (similar to the ones now used in airplanes), the shower (which cleans more efficiently using less water), and the bathroom as a whole. He studied structure shells and devised a number of alternatives, each less expensive, lighter, and stronger than traditional wood, brick, and stone buildings.

Most of this was achieved due to the much needed rise of newer building materials, as well as his structures used the principal of tension rather than compression.

In 1944 the United States suffered a housing shortage. This is when the geodesic dome came into light. It was a single family dwelling that could be produced rapidly and could be installed anywhere.

References:
https://www.bfi.org/about-fuller/big-ideas/geodesic-domes

http://www.bbc.com/culture/story/20140613-spaceship-earth-a-game-of-domes

By: Mark Girton

Saturday, February 24, 2018

What is ESD

What is environmental sustainable design and why the geodesic dome?
ESD has several main principles that are in place to minimise damage  to the environment, whilst still maximising the health and comfort within buildings. These principles include some of the following:

  • Optimising site potential
  • Minimising non-renewable energy consumption
  • Using environmentally friendly products
  • Using energy and water efficient appliances
  • Reducing potable water use
  • Enhancing indoor environmental quality
  • Optimising operational and maintenance practices

By incorporating ESD you are not only able to aid the environment but yourself, it helps reduce bills through lower energy,water consumption and a lot cheaper operational costs.

There are several main points as to why the geodesic dome is sustainable, that main two being their ability to produce little to no waste and they have high energy efficiency.The dome guarantees a 50% increase in energy efficiency in comparison to the averaging building structure, this will reduce energy cost and minimise environmental footprint which are two major principles in ESD.

Friday, February 23, 2018

Alternative Wall Construction Project Brief


This blog is to record our project of alternative wall construction.

Our task is to construct a 1:2 model of a sustainable building system. The system needs to incorporate a wall, window and a roofing system. The integrity of the system will be tested with a hose simulated rainfall for 2 minute period.

We have chosen to do a Geodesic Dome construction for our project. The design development, construction and testing process will be recorded as a journal in this blog.

by: Yijing